Made at 173

Here's where we left off:
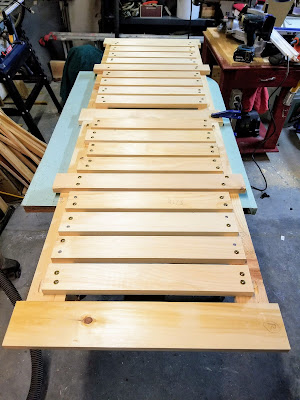
The frame was done and it was time to cut the slats. I fretted forever trying to figure out the necessary width of the slats and the spacing between them. I've always been a little shaky with geometry, so I looked up different calculators and formulas. In the end, I chose 1x3s for the slats, and by using some leftover parting bead from the aborted window project, it turned out 1/2" spacing was perfect!
If you notice above, the fifth slat in is longer than the others, that's because of a few features that went into my final design of the cover...
Obviously I'm not much of an artist, but this gives an ideas of what the plan was. I figured in a space at the top to allow war air out (heat rises after all) and a cold air return at the bottom. Also, I want to be able to use this as a bit of a window seat, and that's where the long slats come in - just a little extra support! Moving on, you know how everyone has their peccadilloes? Well, as you may know if you've been following 173 for any amount of time, I have a tendency to over-build, and because I worry about the expansion and contraction of the wood due to the heat, I used some serious screws to attach the slats...
GRK Fasteners makes some great products! Don't worry, this isn't an add - they don't even know I exist...but I used their architectural screws when I re-furbished the front stoop, and was amazed! Sounds like hyperbole but seriously, they're tough as railroad spikes and, because of their design, I didn't need to pre-drill at all! So when deciding on the screws for this project - it was an easy decision!
Here's something worth mentioning, I took great pains to ensure the slats were as near-perfect to perpendicular (look at me - using f%$#@ng geometry terms!) as I could get them. Only the very last slat needed to be skewed about a millimeter at one end to make it right, otherwise the slats went on rather quickly.
I really wanted to line the screws up nicely so the face looked nice from behind, but I was trying to not put a screw in a growth ring so as to aide in adding strength and avoid splitting. It worked but the backside looks like a prison break! And here's where we leave off today!
Now starts the details and building the ends of the cover...Happy Thanksgiving everyone!


