Installation
Wallpaper!
When we last we met, the bathroom had been completely prepped for wallpaper installation. Here's the thing, with as much wallpaper as we've hung here at 173, you'd think we'd have a system down and actually kind of enjoy wallpapering. But there's something a little stressful about wallpaper. I don't know if it's because wallpaper is so expensive or because one little error wastes a whole sheet. Or maybe it's because hanging paper is so tedious and time consuming. But whatever it is, and even though it's so satisfying, it's not the most enjoyable thing here at 173. Nonetheless, there's been progress - let's get into it!
The Product
After visiting a couple stores and signing out a few wallpaper sampling books, patience dwindled quickly and the hunt was on via the web. It still took several hours over a few days, but we eventually found an attractive pattern called linen. From there it was a matter of choosing the color. We ordered a few swatches so we could see them live and in place.
The five finalists were:
- Turquoise Silver
- Pale Turquoise
- Blue Gray
- Light Blue
- Pale Green
While each of them were nice colors, some washed out in the various shades of light and dark in the bathroom, a couple were also so similar to what we just pulled down that it would have felt like there was no difference after all the work. But one color caught our eye through all levels of light and dark, and was different enough that it felt like a real change for 173. And the winner was... Caselio Linen Wallpaper in Pale Green.
It's a fascinating color, and as you will note throughout this post it looks anywhere from light green to a blue - all of the shades looking great!
Once the wallpaper arrived - it was time to start getting it on the walls!
The Staging Area
Among the keys to success in wallpapering is having a place to prepare each sheet to measure, cut and (usually) paste. I say "usually" because this is the first wallpaper project where the glue is spread directly to wall rather than onto the paper.
My wallpaper and I are fighting a duel to the death. One or the other of us has to go. - Oscar Wilde
Probably much because we are older and less willing to make a thousand trips up-and-down the stairs, we decided to use the study for the staging area...
This worked out really well, especially because we didn't have the glue mess that usually accompanies the "paste on the paper" method!
Old School Resources
Now the prep work is complete, it's time to start hanging wallpaper. I mentioned back in the Hallway and Stairwell Wallpapering project that I had referenced the 1973 Reader's Digest Complete Do-it-yourself Manual a number of times since buying 173, and I referenced it again for this project.
This book has a lotta stuff in it covering everything from abrasives to zoning regulations, and I've referred to it for any number of projects. Every time wallpaper is the proyecto del día, I refer to this page in particular to get a sense of the best place to hang the first length of paper, etc.
And while I could and do look things like this up on the internet, sometimes it's just nice to crack open an old book, and here's another bit from that page...
Finally! The First Strip!
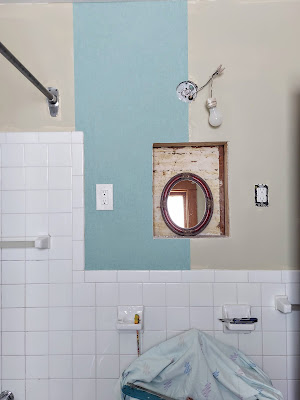
After all the prep work, and waiting out the humidity of the summer (that'sright - papering was on hold for a few weeks!), it was finally time to get the first strip of paper up! And here it is!...
I told you - in some light it looks blue!
Then More Went Up!
It didn't take too awfully long to het that first wall done. A couple hours over the weekend...
And as the natural light faded in the window, the color changed once again!
And you may have noticed the new medicine cabinet/mirror. This time around we wanted to go with the recessed style of cabinet as opposed to the surface mounter put in with the last remodel.
Not only is this one larger, it also has mirrors inside, making it feel even larger and much brighter!
And we've done a little more papering since...
But we'll get more into that with the next post. For now, I leave you with a look back...
And looking forward to the next steps toward a completed project. Thanks for seeing through to the end of this post and - see ya' next time!


