Porches
Teardown
━━━━━━━━━━━━━━━━━━━━
Eight(!) years in the making
Final phase of 2016 project
Final phase of 2016 project
━━━━━━━━━━━━━━━━━━━━
This is a fun project to report on - a little embarrassing but fun nonetheless. You see, this project really should have been done as far back as 2016, but the stopgap move we took back then made us a little comfortable and probably even complacent. Well, it occurred to us that this little project needed to happen... finally. This project will span at least three or four posts and this is Part 1 so, let's get into it.
1997
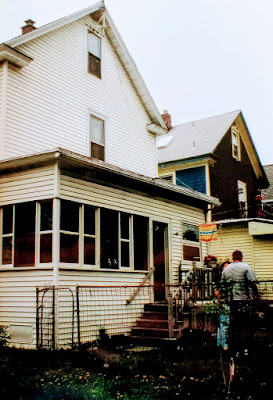
Before we start, let's just take a look at where we were way back in 1997. When we first bought the house, 173 was monochromatic white. All white is a clean and crisp esthetic until that white becomes dated, old, starts staining and just gets looking kind of run down, but that's where we were back in '97.
Of course, some 27 years later, things look a bit different!
Iterations
iteration /noun/ - the process of doing something again and again, usually to improve it, or one of the times you do it.
As you saw, the back porch exterior was white (like the rest of the house) when we bought 173 in 1997.
Then in 2011, after putting new windows in the back porch in 2010, I was getting real down on the look of 173's exterior and I just wanted the back porch to look better. The front porch was shingled, so I thought - why not?
Besides, shingles were pretty inexpensive. At that time we intended for 173 to have a white and brown exterior inspired by so many of the houses in the the Adirondacks.
Then, sometime in 2016 we decided to go in an entirely different direction. After considering any number of colors, and having a vision for where we wanted to go, chose a Flagstone shingle-style of siding. The nice thing about the color is that it's a very, very dark gray, but in the sunlight, it looks like a nice shade of medium blue.
So the interesting thing is, after we had the front porch and the triangle at the top of the house sided in Flagstone we had enough of the vinyl siding to finish the back porch, which was always the intent. But at the end of that summer we still hadn't gotten to it so we ended up storing the rest of the materials under the back porch. In the meantime, the siding is Certainteed Vinyl in Flagstone, we bought a gallon of Elephant Gray paint, which is a perfect match to the Flagstone, and painted over the cedar shingles, fully intending to come back to that when spring came around. However, as you know by now we are finally getting to it in 2024. I don't even know what else to say. So here's what the back porch looked like up until just a couple days ago...
The way a crow shook down on me the dust of snow from a hemlock tree has given my heart a change of mood and saved some part of a day I had rued. - Robert Frost
Take it Off!
This will be the easiest part of the entire project, removing the old cedar shingles from the porch. It takes nothing more than a pry bar, the occasional hammer and a drill driver. That's right when I put the shingles in the first time, on a number of them, for whatever reason (I've long since forgotten why) I chose to do this but, on a number of them I used screws. Nonetheless, it took probably 20 minutes to remove all the shingles from the east wall - screws and all.
And even though the south wall is less than half the size of the east, I think it took us a good half hour to remove the shingles. The reason is mostly because it was a little bit cramped in that corner from the Weigela and Cyd sitting right there. I really would like to not move him because he's been in that spot for quite a few years now and I just feel like if we move him, we'll never get Cyd back in the right spot where he's been stable all this time.
Wrapping Up
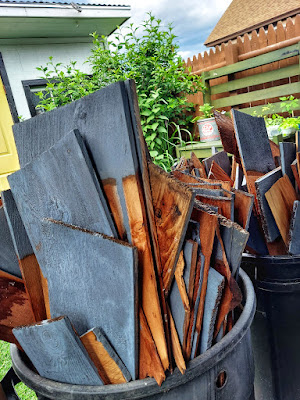
After the shingles were off, we just pulled all the nails and cleaned up all the little scraps. We put the shingles into a couple of (clean mind you), garbage cans, and at some point we'll stack them, twine them up and store them for some future project. Part of me wants to put shingles on the lower half of the shed, I'm just not sure how that will work out. But if we decide to, we'll have shingles all stored away and ready to go!
So this was a nice start to the this project. The next step will have to be the window sills before we can really move on to anything else, and we'll tell you all about that in the next post. Hey, thanks for stopping by - see ya' next time!


