Back Porch
The East Wall
Well, the heatwave in the Northeast finally broke and although it was still very hot outside, the humidity was almost completely absent, making for a very comfortable but...still hot...day. So we got an early start to take advantage of this break in the weather to see how much we could accomplish on the East wall. Let's get into it.
Where We Left Off
Just to reset, let's take a quick look at where we left off back on July the 7th. Up to now, the South wall had a new window sill and the siding's done. On the East wall, a new window sill's been crafted, installed and painted. All that said...it's finally time to get to the siding!
A Little Prep Work
Before we could really get started installing the siding, we had to do a little prep work. And when I say prep work really all I mean is, we had to move the steps away from the back stoop because they're very close to the wall we'll be working on.
Fortunately back when I re-did the stoop in 2016, I had the foresight to not attach the steps to the stoop itself. The steps are so heavy, I knew they would never go anywhere. Besides, they were also attached to the stoop in the sense of the railings being attached, so I never had any fear of them moving. To get them out of the way for the siding installation, all I had to do was remove the railings that went from the stoop down to the bottom step, and muscle them out of the way.
How often have I lain beneath rain on a strange roof, thinking of home. - William Faulkner
Starting Installation
There were really only two serious considerations to keep in mind as we started on the East wall. The first was to make sure the rows (coarses) line up with the courses of the siding on the South wall. The only other thing to really keep in mind and be very fastidious about was keeping the courses level. To do that, we spent considerable time setting the starter strip to make sure - #1...that it was at the right height to set the courses around the corner were aligned, and #2...to keep the entire wall level.
Rather than snapping a chalk line for level, I used my 72 inch water level that, my cousin bought for me several years ago. Now, I have to say that if you own an old house like 173 and do any work yourself, you just gotta invest early in a 72 inch level. Let's of your place is anything like 173, nothing's square, plumb, or level and a long level will come in handy in more ways than you'll ever realize. As a matter of fact, get every size you can, small to large - you'll need 'em all at one time or another!
Siding (verb-wise)
Once the starter course was in place, the rest of the courses went up fairly easily. I say "fairly easily" because there were spots where we ran into dips or voids for which we had to improvise by shimming here and there. And for whatever reason, when I really get going on a project I forget to take progress pictures, and the same holds true here. So, this next picture showing one and a half courses to go was the first time I thought about it.
Siding Done!
And that's that... the siding is on!
The Band Board
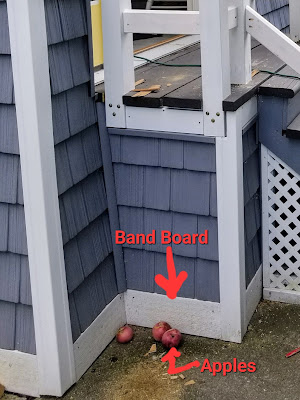
The what? A band board, also known as belly band siding or beauty boards, is a decorative trim that runs horizontally across a house. It's usually installed at the first floor level, but can also be installed on the second floor. Here at 173 I decided to use decorative bands at the bottom of all the slate gray siding. This works with the white corners giving what I think is a bit more of a striking look!
As it turned out I had two nice leftover boards from the front stoop, so of course I used them here on the East wall.
And here's the band board on the now-sided East wall! I think the band board really makes the whole thing pop!
A Couple More Shots!
I think this wall took us about 3.5 to 4 hours, greatly slowed by the need to problem solve and improvise. Nonetheless, it was a nice day to be outside!

I love the whole process of a project, but there isn't much more satisfying than standing back and admiring the results of the time and work!
The next step...trimming the windows! Hey, thanks for stopping by - see ya' next time!


%20(1).heic)

